

The Basics of Brake Bleeding
The Basics of Brake Bleeding
With the right bleed kit, a little bit of know-how and 30 minutes to set aside you can easily breathe new life into your hydraulic mountain bike brakes.
Before you jump right in and choose your bleed kit, lets talk about what brake bleeding is, why it's important and explain the benefits of taking the plunge and bleeding your own brakes.
Why should I bleed my own brakes?
With bike shops charging up to £20 to bleed each brake, not to mention the 2 week waiting time before they can fit you in, there's never been a better time to take matters into your own hands when it comes to brake bleeding. Avoid the wait and the hassle of getting the thing down there, this is one job that you can easily do yourself. Bleeding your own brakes can also allow you to:
- Save time
- Save money
- Learn a new skill
- Get back on the trail in no time flat!
What is brake bleeding?
The term 'brake bleeding' refers to the process by which air bubbles are removed from the brake fluid used in hydraulic braking systems. The same process of bleeding air from the system is also used for purging the system of old brake fluid and replacing with new, therefore both procedures can be performed at the same time.
#1 Removing air

For hydraulic systems to work efficiently they must rely on an incompressible fluid as a means of transferring forces.
In hydraulic braking systems the input forces you create by operating the brake lever travel via the brake fluid to operate the calliper pistons, which in turn, move the brake pads to contact the rotor. This is only possible because the brake fluid is incompressible.
Think of brake fluid then as a means of communication. The brake fluid transmits the message given at the master cylinder (lever) to the slave cylinder (calliper) with minimal loss in quality.
Air in the system causes a breakdown in this communication. Input forces created by operating the brake lever can no longer be transmitted effectively as these forces are wasted as the air inside the system is compressed.
How do I know if I have air inside my brake?
There is one classic sign of air inside any hydraulic mountain bike brake and that is excess lever travel - sometimes referred to as a 'spongy' or 'loose' brake lever.
If the lever has to be pulled a good distance before you feel the pads engage (or bite) the brake rotor then there is a good chance it is down to air inside the brake fluid. Take a look at the following diagram:
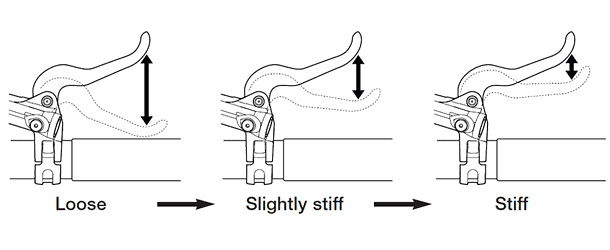
On the left we can see that it is possible to pull the lever back to the handlebar. Here the brake system has too much air inside resulting in little to no stopping power. This brake needs to be bled before it can be used.
The middle lever still has to travel a good distance before the bite point is reached and the brakes start to work. This suggests that air is present in the system but not enough to render the brake completely useless. This brake should be bled to create a firmer feeling brake lever.
The example on the right is what we consider to be a healthy brake lever feel. Firm, sharp, confidence inspiring. This is how your brake lever will feel after a successful bleed.
So how did the air get in there in the first place?
If you open the system to air, when shortening hydraulic hoses for example, this can lead to brake fluid loss and air entering the system. Damaged brake lines, joints, perished seals and leaks can also be to blame for air entering your brake and causing your lever to feel spongy.
Sometimes even a brand new brake, or the brakes fitted to a new bike will need to be bled if the brakes have been inadequately filled at the factory during production or your bike shop has failed to carry out the work for you.
#2 Renewing brake fluid

Part of the general maintenance and upkeep of your hydraulic brake is to periodically change the brake fluid. Over time your brake fluid will become old and discoloured as it takes on contaminates from the environment. Dirt, air and water can and will find their way in eventually.
Replacing the brake fluid occasionally will keep these to a minimum and extend the life of your brake and keep it performing like new.
OK, so air and dirt are bad. What's wrong with water?
If air is the arch nemesis of your hydraulic brake then consider water to be its shifty sidekick. Whereas too many air bubbles can render your brake immediately useless, water causes problems over longer periods of time and your brake fluid is partly to blame.
Depending on whether your brake model uses DOT or Mineral Oil brake fluid will determine the effect that water can have on your stoppers.
DOT brake fluid is hygroscopic by nature which means it absorbs water from the environment via seams and microscopic pores in your hydraulic lines. This water content has an adverse effect on the performance of DOT brake fluid by reducing its boiling point. Typically DOT brake fluid will achieve 3.7% water by volume after 2 years of service.
The effects of this water content over time are better illustrated by the graph below. This graph is taken from Shell and gives an overview of the declining effect water content has on its range of DOT 3 and DOT 4 brake fluids.
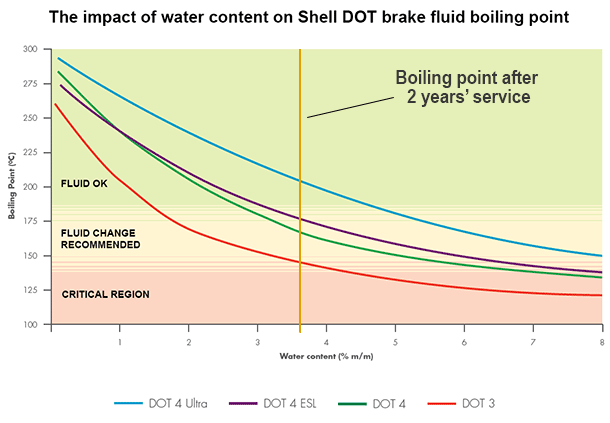
As you can see, over a period of 2 years the decline in boiling point means the fluid's ability to resist the high temperatures created by braking is severely reduced.
Mineral Oil brake fluid is different to DOT fluid, it does not absorb water, instead it repels it causing it to pool in low spots within the system due to its heavier weight. Here it not only reduces the boiling point of the brake system it can also cause localised corrosion of your brakes' internal parts.
How often should I bleed my brakes?

When you suspect air may be present in your brake system and your brake lever starts to feel spongy, it is time to bleed your brakes.
Many riders will only ever bleed their brakes when trapped air is affecting their braking, but since you now know the affect that water content can have on your brakes perhaps more routine brake fluid changes are in order.
Riders who race and demand the most from their brakes may consider changing their brake fluid annually. For the rest of us changing the brake fluid every two years to maintain a high boiling point is recommended, especially in those brakes which use DOT brake fluid.
How do I know which brake fluid to use?
That depends on your brake model. As we've discussed there are two types of brake fluid in use in hydraulic mountain bike brakes today - DOT fluid and Mineral Oil. Brake manufacturers tend to stick to one or the other. The table below provides an overview of who uses which brake fluid.
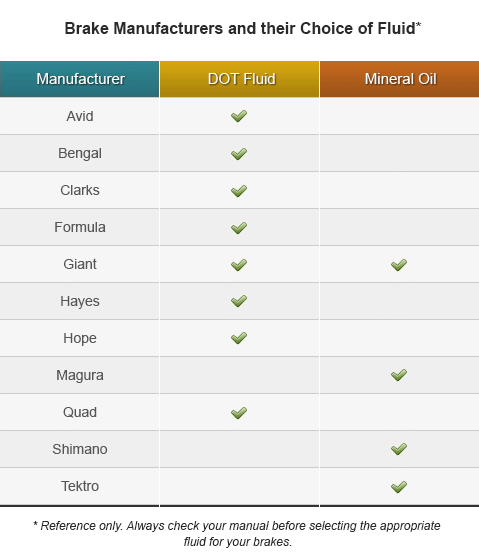
Be sure not to introduce the wrong brake fluid into your brake as you will ruin the internal seals and ultimately your brakes. Remember, DOT and Mineral Oil brake fluids are not compatible with each other, which means they should never be mixed under any circumstances. If you're unsure of which brake fluid to use you can always ask us.
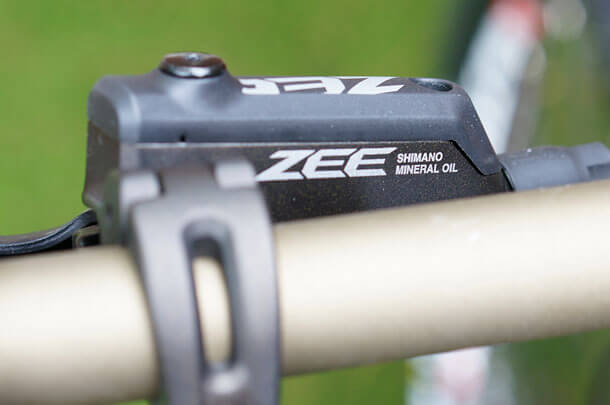
| The type of fluid used in your brake can also usually be found printed on the brake lever assembly. |
Let's take a look at the stuff you'll need to get the job done
OK, so now you're getting the gist of the brake bleeding thing, allow me to break down exactly what you need to complete the job:
- Bleed Kit - containing syringes, bleed adaptors, how-to instructions
- Brake Fluid - DOT or Mineral Oil, depending on your brake model
- Bleed Block - to keep the calliper pistons in the reset position during the bleed process
- Basic Tools - for removing bleed port screws, brake pads and adjusting the position of your brake lever or calliper
- Protective equipment and paper towels - brake fluid can be nasty stuff. Keeping it off your hands and out of your eyes is always a good idea
The picture below shows the equipment needed to carry out a full bleed of an Avid brake system - and between you and me, most people don't bother with half of this stuff.

Here's an overview of a typical bleed process
Below I've summarised the Avid bleed procedure. This should give you an overview of the main steps involved.
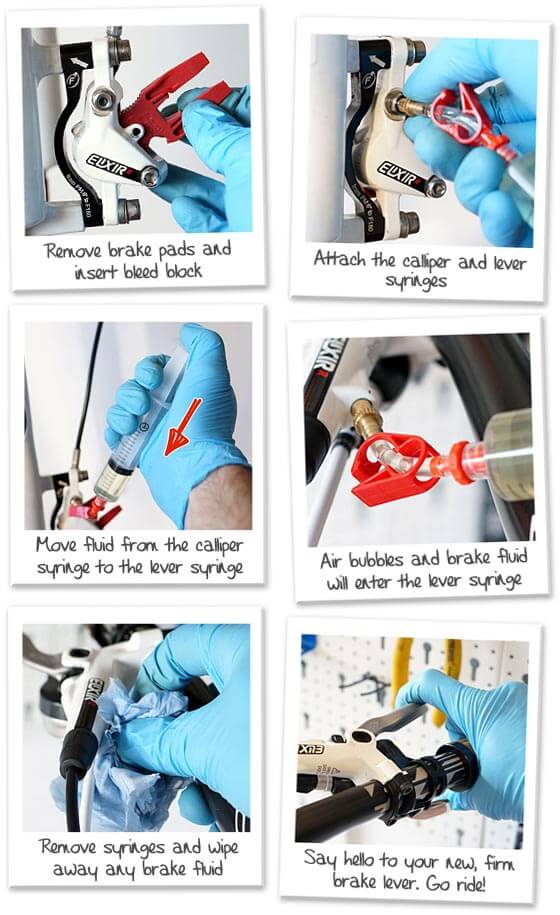
Aside from filling your syringes with brake fluid and removing your brake pads this shows you just how easy bleeding your own brakes can be. Easy, right?
Over to you
As you'll see, there's not a lot to it. Hopefully I've given you some insight into the basics of brake bleeding and the confidence to go forth and bleed your first set of brakes. Save the call to your local bike shop for when you truly need it. Take matters into your own more-than-capable hands - I believe in you!
Have you got a question of your own? Or perhaps you've got a brake bleeding story to share with us. Please leave a comment below, we'd love to hear it!


